The following article will discuss the steps to export Gmail emails to PST. It will also share why you should always backup Gmail emails.
We are here to give the in-depth details about the methods to export your email in the Outlook supported format.
There are various reasons why users choose Gmail as their email client. It’s free, the major reason, it’s fast, and it is available at all times.
However, people are still facing some issues and want to move their emails from their mailboxes.
Why?
Well, as useful as Gmail is, it still has a few drawbacks.
Users are looking to export email from Gmail to PST because they are worried about their data.
Even though Google’s security system is pretty tight, it is still not 100% safe.
Many people have faced virus attacks, their accounts being hacked, and data being compromised.
That is not the only reason, there are some human errors as well.
The biggest error being accidental deletion of emails.
Yes, a lot of users make this mistake and then panic over their lost emails.
If you save email attachment from Gmail, you will not face this issue.
But, What Are the Reasons to Export Gmail Emails to PST?
There can be many reasons to change your email format such as exporting Gmail emails to hard drive or switching your organization.
Now, the benefits of using the Outlook accessible file format are:
- These files offer a backup solution which you can store on your computer and access offline.
- The files are secure because they can only be opened in Outlook.
- You can set a password on them to keep them safe from the reach of others and avoid hacking.
- The storage size of this file format is 50 GB, another reason to export email from Gmail to PST.
- Due to the size of these files, you can store all the mailbox items including emails, contacts, calendars, etc.
- It is easy to create and delete these files.
Now, let’s take a look at the steps to export these files.
There are two ways to convert these files. One is for Windows users, the other is for Mac OS users.
First, we will download the emails and then convert them.
Part 1 – How to Download the Emails to Your Local Computer?
We will use the Google Takeout tool:
1. Log in to your Gmail account to export Gmail emails to PST.
2. Click on the 9 dots Menu on the right side and click on the Account option.

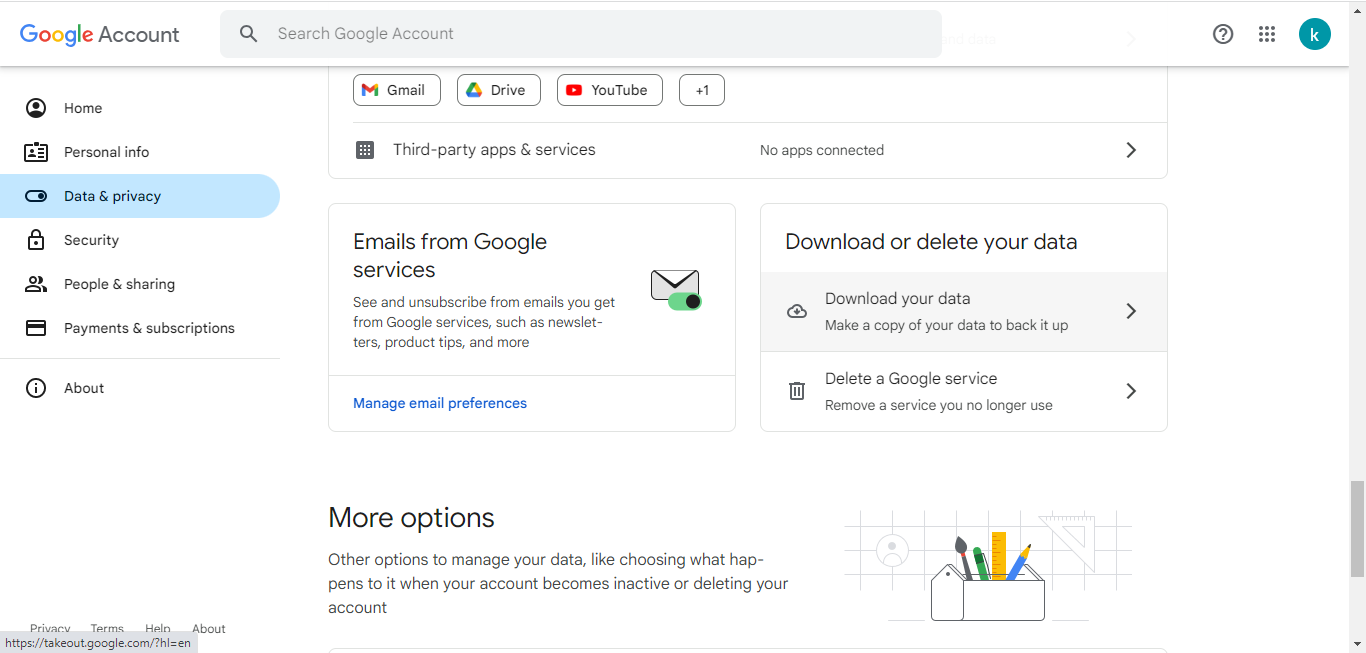
3. Choose Data & Privacy from the left panel and click on the Download your data option.
4. Here, click on the Deselect All option and scroll down to the Mail section.
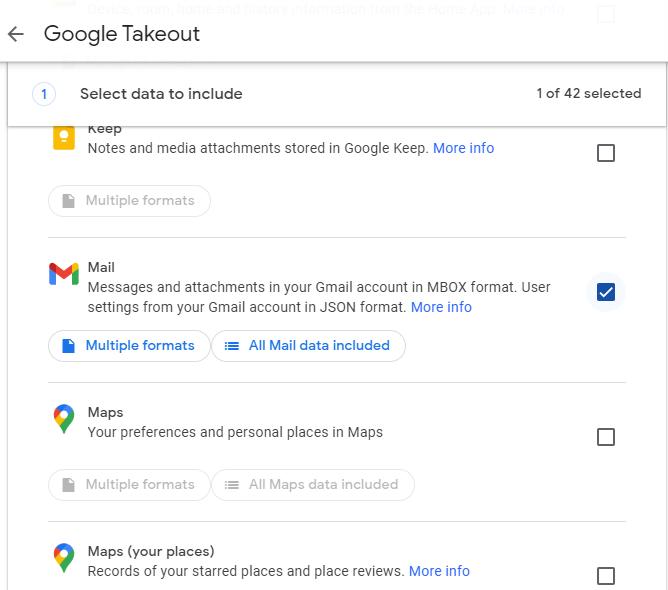
5. Hit the Next Step button.
6. Select the Destination as per your desire.
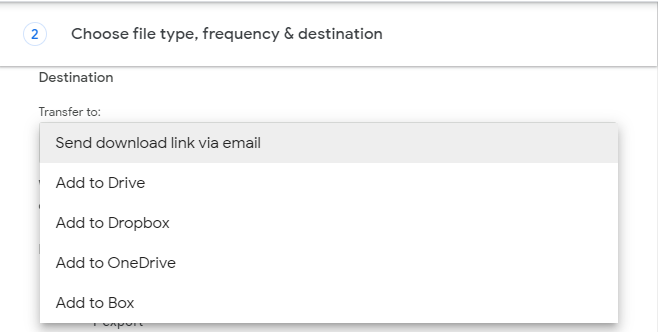
7. Set the File Type, File Size, & Frequency of the export.
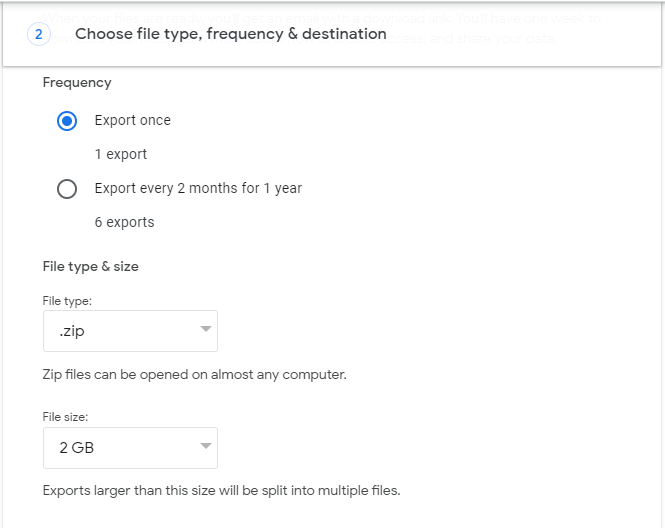
8. Press Create Export.
Your data will start downloading, It may take a few hours or days as mentioned. It will be saved in the .zip or .tgz format, whichever you choose.
Part 2 (Windows OS) – Export Email from Gmail to PST by Using Thunderbird
This part has 2 sections:
First – Save the data as EML files:
1. Open the Thunderbird app. Right-click on a folder and choose New Folder.
2. Choose the emails and add them in the new folder.
3. Click on the Save As option and the data will be saved as .eml in the chosen location.
4. Open the folder, select the files, drag-and-drop them in Outlook.
Second – Export Emails from Gmail to Outlook
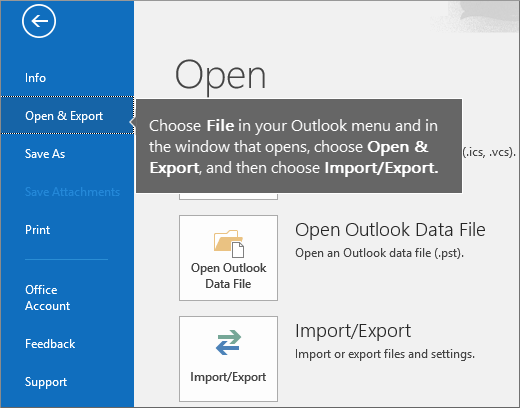
1. Launch Outlook → File → Open & Export → Import/Export.
2. In the Import/Export window, choose Export to a file → Next.
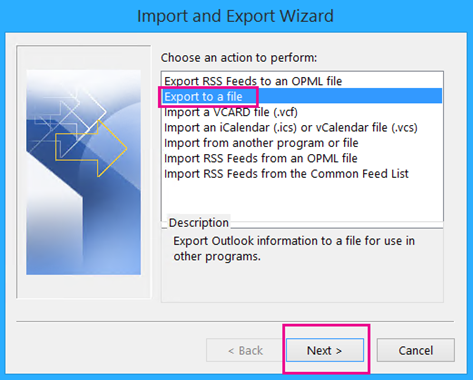
3. Select Outlook Data File (.pst) → Next.
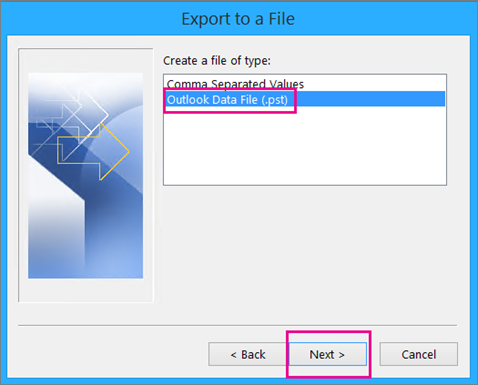
4. Browse for the folder & hit Next.
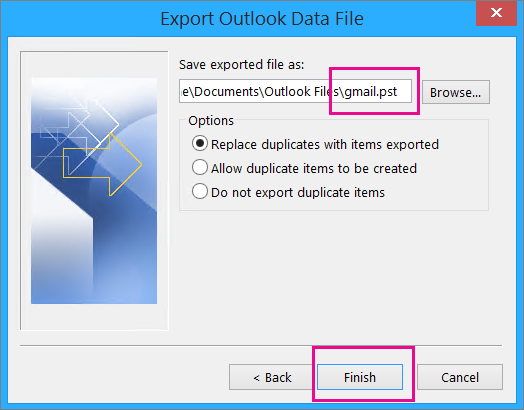
5. Click Finish.
Part 2 (Mac OS) – Export Gmail Emails to PST by Using Apple Mail
This is a lengthy procedure so we are going to divide it in 4 different sections.
First of all, we will be importing the data to Apple Mail.
Then, we will use the Eudora application to add the file extension to these emails.
After that is done, we will import the new folder by using the Outlook Express application.
Lastly, we will move the mailbox to the Outlook application.
We suggest you carefully follow all the steps.
Let’s start.
Step 1 – Importing the Emails to Apple Mail
Here is how to export email from Gmail to PST:
1. Start your process by opening Apple Mail on your PC.
2. Select the File tab and choose the Import Mailbox option.
3. Choose the MBOX file and click on Continue.
4. Now, opt for the MBOX files in the Browse window and press Continue.
5. Hit Done.
Step 2 – Adding Extension to the Files With the Help of Eudora
Follow these steps:
1. Here, you have to add the .mbox file extension.
2. Now, move the emails to the Eudora directory.
3. The location – Documents & Settings user → Application Data\Qualcomm\Eudora
4. After that, launch Eudora and open the .mbx file.
5. Close Eudora.
Step 3 – Export Email from Gmail to PST by Using Outlook Express
Now, we will import the emails by using the Outlook Express application via:
1. Open your Outlook Express app and go to Files → Import → Messages.
2. From the list of email clients, select Eudora and hit Next.
3. Navigate to the location of the .mbx files and hit OK.
4. Hit Next → Next → Finish.
5. Data will be saved in Outlook Express Local Folders.
Once all of this is done, we will now be moving on to the final step of this process.
Step 4 – Export Gmail Emails to PST by Using Import/Export Wizard
Final steps are:
1. Go to your Outlook app and click on the File tab. Choose Open & Export and hit Import/Export to open the wizard.
2. Now, select the Import Internet Mail and Addresses option and press Next.
3. Choose Outlook Express → Import Mail → Next → Finish.
4. Finally, hit the Save button.
5. This way you can easily convert your data and save it.
However, if you want a simpler way, try to find a tool from the list of Gmail backup tools.
Some of these tools allow you to convert the data files directly without following so many steps.
Once you have the files in Outlook accessible format, you can easily export them in Outlook.
Final Say
The methods to export Gmail emails to PST are a bit lengthy, and may be a little difficult for some people to understand. However, these are the only ways available. If you are finding it difficult to perform these steps or even understand them, you can always choose a tool.
It is important to keep your data safe for any possible reason and have offline access to them. Offline files come in handy when there is no internet connection and you want to use the data.


